Select Vehicle
Categories
- Acura
- Audi
- BMW
- Buick
- Cadillac
- Checker
- Chevrolet
- Chrysler
- Daewoo
- Daihatsu
- Dodge
- Eagle
- Ford
- Geo
- GMC
- Honda
- Hyundai
- Infiniti
- International
- Isuzu
- Jaguar
- Jeep
- Kia
- Land Rover
- Lexus
- Lincoln
- Mazda
- Mercedes
- Mercury
- Mitsubishi
- Nissan
- Oldsmobile
- Opel
- Plymouth
- Pontiac
- Porsche
- Saab
- Saturn
- Subaru
- Suzuki
- Toyota
- Triumph
- Volkswagen
- Volvo
- Other Products
- Dash Illumination Parts
- Dash Restoration Parts
67-72 Chevy Truck Lens Install
Ryan Blackburn - Photos
Justin Smith - Text
CLICK HERE FOR LINK TO PRODUCT PAGE
Overview:
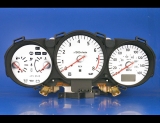
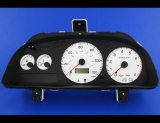
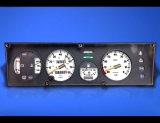
This tutorial will cover the preparation of the replacement lens for the 67-72 Chevy trucks. It is a fairly simple process if you take your time and just think things out before you dive in. Please read this tutorial all the way thru and it will help you get an idea of what is involved.

The lens kit as it is shipped.
To begin:
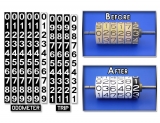
First, you will want to make sure you have everything you need. The kit should have the lens with protective paper on it, the white light diffuser, install kit and a sealed bag with the different gauge options. You will want to open the bag and check to make sure you have the gauges needed for your cluster. We have tried to include everything.

The light diffuser has clear tape on it so it helps to determine what side of the lens it goes on.
Light Diffuser:
The light diffuser is there to help the stock lighting illuminate the markings on the lens. The light essentially bounces off the white on the front of the lens, and travels thru the plastic until it catches the edges of the markings that will be installed in a few steps. To begin the installation of the light diffuser, you will need to pull the new lens out and compare it to the light diffuser. You see the notch in the image above on the middle gauge? You need to have the lens with that notch on the gauge. From there, you can remove the protective paper from the lens on that side only. Once the lens is exposed you can start the process of installing the diffuser.

The part that is being removed in this picture is the backing material. The diffuser sticks to the clear tape.

You will want to take a soapy water solution and spray the adhesive side of the diffuser. Be liberal with the spray, you wont hurt it.

Just slide it around until you have it where it needs to be. Now use your plastic squeegee and press the moisture out. You need to press pretty hard to make sure it adheres to the lens.

Now you can remove the tape. Just start at a corner and pull. If you squeegeed it down correctly, the tape should come right off. If it doesnt, just use the squeegee some more.
The lens markings:
Now that you have the diffuser installed, it is time to get the lens markings installed. This part consists of removing the paper material from the other side of the lens, lining up the new lens on top of the old one and then installing the correct pieces.

To get started, go ahead and remove the backing paper from the other side. Now stack the 2 lenses. The diffusers are on the other side of the lens from where we are installing the markings.

Now take your first marking overlay and remove it from the backing material. Spray it with the soapy water solution.

Now place it on the lens. Remember, these go on the BACK SIDE of the lens. Not on the same side as the diffuser. Line these up as best you can, but don't worry too much; they need to be close but not perfect.

Now put the sleeve on the squeegee and squeegee the marking overlay. Now you can repeat this for the rest of the markings on the lens.
The Finishing touch:
Now that you have the markings and diffuser installed, you are pretty much done. You will want to make sure you have the pieces down good. Check to make sure no edges have bubbled up. Now you can clean the lens with the same soapy water solution, and install it in your truck.